
Due to recent cyber-attacks, application security has become extremely crucial. NetScaler (ADC ) offers a Web Application Firewall functionality for application security. As mentioned in the article, we have a hybrid security approach for Web Application Firewall, which has its own benefits for NetScaler ( ADC ).
1. What is Web – Application Firewall?
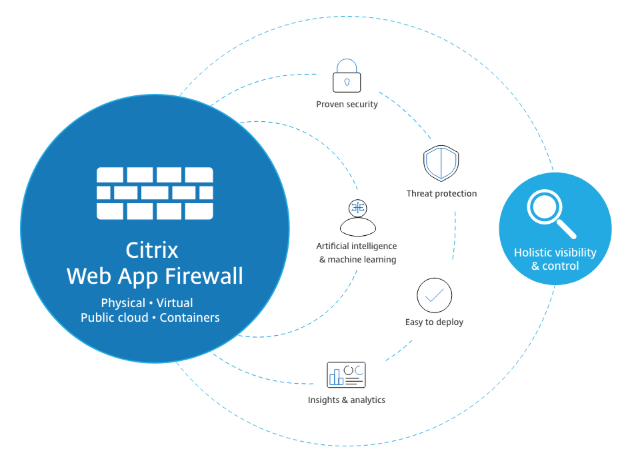
The Citrix Web App Firewall protects websites that access important company or customer data from security breaches, data loss, and unauthorized changes. It accomplishes this by filtering both requests and responses, evaluating them for signs of malicious behavior, and preventing requests that do so.
Your website is safe not only from popular forms of attacks, but also from new, undiscovered threats. The Web App Firewall safeguards against vulnerabilities in older CGI code or scripts, web frameworks, web server software, and other underlying operating systems, in addition to safeguarding web servers and websites from unauthorized access.
To utilize the Web App Firewall, you’ll need to set up at least one security configuration to prevent connections that don’t follow the rules you’ve specified for your protected websites. Depending on the intricacy of your website, you may wish to develop a variety of security configurations. Sometimes a single setup is all that is required. In other circumstances, such as interactive websites, websites that access database servers, and online stores with shopping carts, you may require many setups to best safeguard critical data without wasting time on information that isn’t subject to specific sorts of assaults. Defaults for global settings, which effect all security configurations, can typically be left unaltered. If the global settings clash with other aspects of your configuration or you prefer to tweak them, you can modify them.
2. Features in Web Application Firewall
As stated in Known Web Attacks, Unknown Web Attacks, and How the Web App Firewall Works, the basic Web App Firewall features are policies, profiles, and signatures, which create a hybrid security paradigm. The learning functionality is particularly noteworthy, as it monitors traffic to your protected applications and suggests optimum configuration settings for specific security checks.
Imports is a function that allows you to manage files that you upload to the Web App Firewall. The Web App Firewall then uses these files to perform various security checks or respond to a connection that matches a security check.
You can utilize the logs, statistics, and reporting tools to assess the Web App Firewall’s effectiveness and determine whether additional security is required.
3. Positive and Negative security model
Positive Security :- Positive security model protects against Buffer Overflow, CGI-BIN Parameter Manipulation, Form/Hidden Field Manipulation, Forceful Browsing, Cookie or Session Poisoning, Broken ACLs, Cross-Site Scripting (XSS), Command Injection, SQL Injection, Error Triggering Sensitive Information Leak, Insecure Use of Cryptography, Server Misconfiguration, Back Doors and Debug Options, Rate-Based Policy Enforcement, Well Known Platform Vulnerabilities, Zero-Day Exploits, Cross Site Request Forgery (CSRF), and leakage of Credit Card and other sensitive data.
Negative Security: – To protect against L7 and HTTP application vulnerabilities, the negative security model employs a large number of signatures. Several third-party scanning tools, such as those from Cenzic, Qualys, Whitehat, and IBM, are integrated with the application firewall. The built-in XSLT files make it simple to import rules that can be used in conjunction with Snort’s native format rules. . An auto-update feature gets the latest updates for new vulnerabilities.
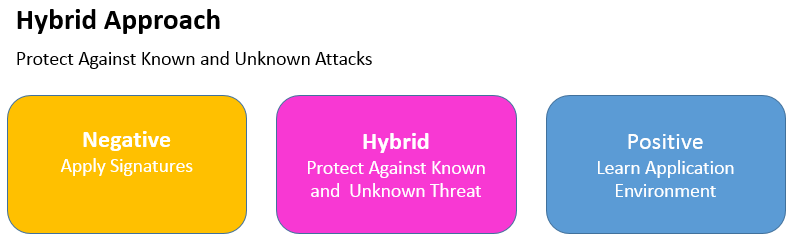
4. How it fits in Hybrid security
Hybrid security model that combines the strength of customizable signatures with the flexibility of using positive-security-model checks for basic or advanced security defenses to prevent attacks that fit specific patterns.
In Hybrid Security Model:
• When a user visits a secured web site and requests a URL, the application firewall checks to see if the request matches a signature. If the request matches a signature, the request is approved. The The application firewall either displays the error object or sends the request to the error URL specified (the error page).
The application firewall applies the request security checks that have been enabled if a request passes signature inspection. The request security checks ensure that the request is appropriate for a website or online service and that it does not contain any potentially harmful content.
If a security check fails, the application firewall either sanitizes the request before sending it to the Citrix ADC or displays the error object.
If the request passes the security tests, it is returned to the Citrix ADC, which completes any remaining processing before forwarding it to the secured web server. The application firewall applies the response security checks that have been enabled when the web site or web service provides a response to the user.
The application firewall applies the response security checks that have been enabled when the web site or web service provides a response to the user. The response security checks look for sensitive personal information leaks, indicators of website defacement, or other stuff that shouldn’t be there. If the application firewall detects content that should not be present in the response, it either eliminates it or blocks it. If the response passes the security checks, it is forwarded to the user by the Citrix ADC.
How firewall work In Hybrid Security Model

• When a user requests a URL on a protected web site, the application firewall first examines the request to ensure that it does not match a signature. If the request matches a signature, the application firewall either displays the error object or forwards the request to the designated error URL (the error page).
• If a request passes signature inspection, the application firewall applies the request security checks that have been enabled. The request security checks verify that the request is appropriate for a web site or web service and does not contain material that might pose a threat.
• If the request fails a security check, the application firewall either sanitizes the request and then sends it back to the Citrix ADC, or displays the error object.
• If the request passes the security checks, it is sent back to the Citrix ADC, which completes any other processing and forwards the request to the protected web server.
• When the web site or web service sends a response to the user, the application firewall applies the response security checks that have been enabled. The response security checks examine the response for leaks of sensitive private information, signs of web site defacement, or other content that should not be present. If the response fails a security check, the application firewall either removes the content that should not be present or blocks the response. If the response passes the security checks, it is sent back to the Citrix ADC, which forwards it to the user
5. WAF Profile
A profile is a set of security settings for protecting specific types of web content or parts of your website. You define how the Web App Firewall applies each of its filters (or checks) to requests to and answers from your websites in a profile.
The Web App Firewall supports two sorts of profiles: built-in (default) profiles that don’t require any additional configuration, and user-defined profiles that do.
There are three types of user-defined profile:
- HTML. Protects HTML-based web pages.
- XML. Protects XML-based web services and websites.
- Web 2.0. Protects Web 2.0 content that combines HTML and XML content, such as ATOM feeds, blogs, and RSS feeds.
6. Policy
Firewall policies and auditing policies are the two types of policies used by the Web App Firewall. Which traffic is delivered to the Web App Firewall is controlled by firewall policies. The log server to which Web App Firewall logs are transmitted is controlled by auditing policies.
Because the policy rule can be made up of several expressions in the Citrix ADC expressions language, which is a full-featured object-oriented programming language capable of describing with high accuracy which connections to filter, firewall rules can be complicated.
Because firewall policies are used in conjunction with the Web App Firewall, they must meet requirements related to how the Web App Firewall works and what traffic it should filter. Firewall policies are similar to policies for other Citrix ADC features if you keep these criteria in mind.
The following instructions do not attempt to cover all aspects of establishing firewall policies; instead, they serve as an introduction to policies and cover the criteria specific to the Web App Firewall.
The policy rule is always ns_true, which makes auditing policies simple. You simply need to provide the log server to which you want to send logs, the logging levels to which you want to send logs, and a few additional criteria that are detailed.
7. Bindings
To put your Web App Firewall policies into effect, bind them to Global or a bind point after you’ve configured them. After binding, the profile associated with a Web App Firewall policy transforms every request or response that matches that policy. To put your Web App Firewall policies into effect, bind them to Global or a bind point after you’ve configured them. After binding, the profile associated with a Web App Firewall policy transforms every request or response that matches that policy.
You assign a priority to a policy when you bind it. The order in which the policies you define are assessed is determined by the priority. Any positive integer can be used as the priority. Policy priorities work in reverse order in the Citrix ADC OS: the greater the number, the lower the priority. Policy priority is critical for obtaining the outcomes you want since the Web App Firewall feature only executes the first policy that a request matches, not any other policies that it might match.
If you give your initial policy a low priority (like 1000), the Web App Firewall will only execute it if other policies with higher priorities do not match a request. If you give your first policy a high priority (for example, 1), the Web App Firewall will prioritize it over any other policies that may match. You’ll have plenty of area to add more ponies later.
When you bind your policies, specify priorities with intervals of 50 or 100 between each policy to give yourself plenty of room to add more policies in any order without having to rearrange priority.
8. Security check
• Security checks guard against attacks, vulnerabilities, and exploits.
• Advanced defenses (security checks) on the Web App Firewall are a series of filters designed to detect complicated or unknown assaults on protected web sites and web services.
• Web App Firewall has twenty security checks that vary in terms of the types of attacks they target and how difficult they are to set up. The following categories are used to categorize the security checks:
-
- – Common security checks
- – HTML security checks
- – XML security checks
Start URL:-
If the URL in an incoming request does not fit the defined criteria, the Start URL check rejects the connection attempt. Unless the Enforce URL Closure parameter is enabled, the URL must match an entry in the Start URL list to fit the criterion. When this parameter is enabled, a user who clicks a link on your website gets linked to the link’s target.
The primary goal of the Start URL check is to prevent users from repeatedly accessing random URLs on a website (forced browsing) by using bookmarks, external links, or manually putting in URLs to bypass the required pages. Forceful surfing can be used to cause a buffer overflow, locate stuff that was not meant for direct access, and more.
Deny URL: –
The Deny URL check looks for and disables connections to URLs that hackers and harmful malware frequently use. This check contains a list of URLs that are frequently targeted by hackers or malicious programs and that appear in genuine requests only infrequently. To the list, you may also add URLs or URL patterns.
The Deny URL check guards against a variety of security flaws seen in web server software and on many websites. Deny URL checks take precedence over Start URL checks, so malicious connection attempts are blocked even if a Start URL relaxation would ordinarily allow a request to proceed.In the Modify Deny URL Check dialog box, on the General tab you can enable or disable the Block, Log, and Statistics actions.
Cookies consistency: –
Examines cookies returned with user requests to ensure they match the cookies provided for that user by your Web server. If a changed cookie is discovered, the request is stripped of it before being transmitted to the Web server. Buffer Overflow is a simple check, and you can typically activate blocking for it right away.
The other three top-level tests are much more complicated, and they require configuration before they can be used to restrict traffic safely. Rather than manually configuring these checks, Citrix highly advises that you use the learning functionality and let it produce the required exceptions.
Buffer overflow:-
The Buffer Overflow check detects attempts on the web server to trigger a buffer overflow. If the URL, cookies, or header are longer than the preset length, the Web App Firewall will stop the request to prevent a buffer overflow.
When an unsecured operating system or web server software receives a data string that is bigger than it can manage, the Buffer Overflow check prevents it from crashing or behaving erratically. By verifying incoming data and rejecting or truncating overlong strings, proper programming techniques prevent buffer overflows.
However, many applications fail to examine all incoming data, leaving them vulnerable to buffer overflows. Older versions of web-server software and operating systems, many of which are still in use, are particularly vulnerable to this problem. You can customize the Block, Log, and Stats actions using the Buffer Overflow security check.
In addition, the following settings can be customized:
• There is a limit to how long a URL may be. The maximum length of a requested URL that the Web App Firewall will allow.
Requests containing longer URLs are rejected. 0–65535 is a range of possible values. 1024 is the default value.
Form field consistency: –
The Form Field Consistency check checks the online forms returned by users of your website and ensures that they have not been tampered with in any way. This check only applies to HTML requests that include a web form, whether it contains data or not. It isn’t applicable to XML requests.
When clients fill out and submit a form, the Form Field Consistency check prohibits them from making unauthorized modifications to the structure of the online forms on your website. It also guarantees that the data a user contributes complies with HTML length and type limits, as well as that data in hidden fields is not altered.
This prevents an attacker from altering a web form and using it to gain unauthorized access to the website, redirecting the output of a contact form that uses an insecure script and sending unsolicited bulk email, or exploiting a vulnerability in your web server software to gain control of the web server or the underlying operating system. Web forms are a weak link on many websites and attract a wide range of attacks.
Field formats:-
The Field Formats check verifies the data that visitors submit in web forms to your website. It looks at the length and type of data to make sure it’s appropriate for the form field where it’s displayed. The Web App Firewall will prohibit a user request if it contains incorrect web form data. The Field Formats check prevents certain sorts of attacks on your website and database servers by stopping an attacker from providing improper web form data to your website.
If a field requires the user to provide a phone number, for example, the Field Formats check checks the user-submitted data to confirm that it follows the format of a phone number. If a field requires a first name, the Field Formats check verifies that the data in that field is of the kind and length that a first name requires. It behaves in the same way for each form field that you specify as protected.
HTML Cross-site Scripting: –
The HTML Cross-Site Scripting (cross-site scripting) check looks for probable cross-site scripting attacks in both the headers and the POST body of user requests. If a cross-site script is detected, it either alters (transforms) the request or blocks it.
HTML SQL Injection.
Looks for attempts to insert SQL instructions into a SQL database in requests that contain form field data. If injected SQL code is detected, this check either stops the request or transforms the injected SQL code harmless before sending it to the Web server.
Note: If both of the following circumstances apply to your setup, you must ensure that your Web App Firewall is configured correctly:
– If you enable the HTML Cross-Site Scripting or HTML SQL Injection checks (or both), and – If your protected websites accept file uploads or have Web forms with significant POST body data.
9. Relaxation rule
Configuring a Web App Firewall rule or relaxation. You configure two different types of information in this dialog box, depending upon which security check you are configuring. In most cases, you configure an exception (or relaxation) to the security check. If you are configuring the Deny URL check or the Field Formats check, you configure an addition (or rule). The process for either of these is the same.
We have created a lab environment to explain Hybrid security model.
Lab Environment Overview: This lab guide will help you to work with Citrix product components and do the required steps to configuration of Citrix ADC for web application security.
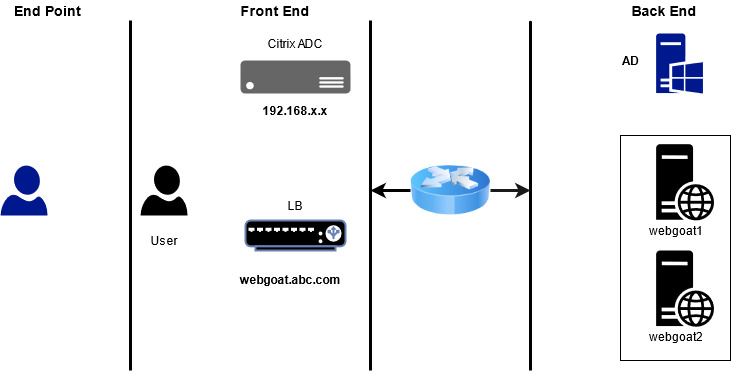
SERVER LIST:
| FQDN | IP Address | Description |
| ad.abc.com | 192.168.x.x | Domain Controller |
| adc.abc.com | 192.168.x.101 | Citrix ADC |
| webgoat.abc.com | 172.X.X.112 | Web Server ( LB ) |
In This environment we have two web application node for WebGoat website. We already configured load balancing on Citrix ADC for web Application Webgoat1 and webgoat2 and our load balancer FQDN is webgoat.abc.com and Load Balancer IP 172.x.x.112
Task-1: Enable Citrix web application firewall
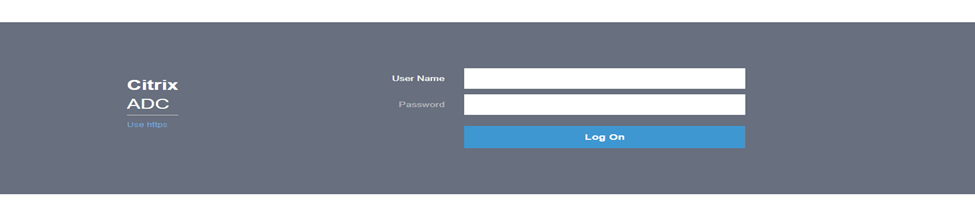
Step-1: Connect to the Citrix ADC Configuration Utility using the NSIP at http://192.168.x.101 and Log on to ADC using credentials
Step-2: Test the connection to webgoat.abc.com web application without Citrix Web App Firewall enabled:
Browse to http://webgoat.abc.com/ Make sure that the webgoat Home page is successfully loaded.

Step-3: Enable basic features on the Citrix ADC:
Browse to System > Settings > Click Configure Basic Features
Make sure that the following features are enabled:
- SSL Offloading
- Load Balancing
- HTTP Compression
- Content Switching
- Rewrite
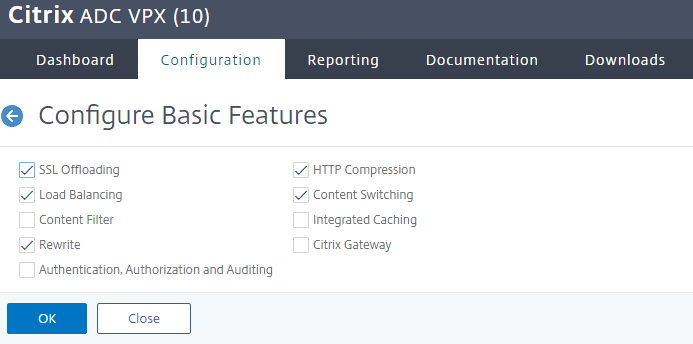
Click OK.
Step-4: Enable advanced features on the Citrix ADC:
Browse to System > Settings > Click Configure Advanced Features.
• Keep default features enabled (Surge Protection and WebLogging).
• Enable the following additional features:
- Responder
- Citrix Web App Firewall
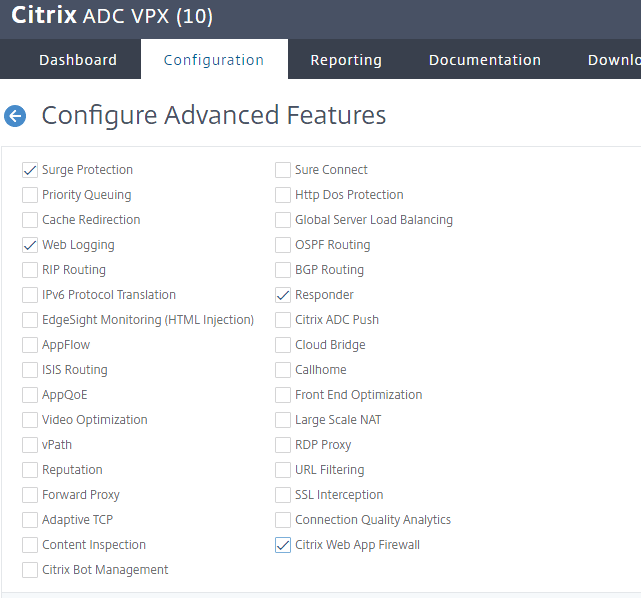
Click OK
Task-2: Create a Citrix Web App Firewall profile for webgoat.abc.com
Step-1: Browse to Security > Citrix Web App Firewall > Profiles > Click Add.
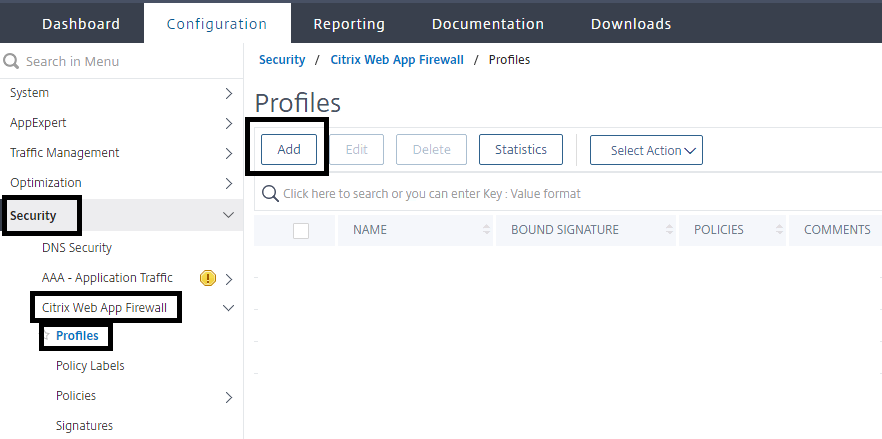
Create a profile for web applications with basic default setting
Enter appfw_prof_webgoat in the Name box.
Select Web Application (HTML) under Profile Type.
Select Basic under Defaults.

Click OK.
Step-2: Create a basic error page for use with Citrix Web App Firewall violations
Browse to Security >Citrix Web App Firewall > Imports.
Make sure that HTML Error Page tab is selected and click Add. Select Text under Import From.
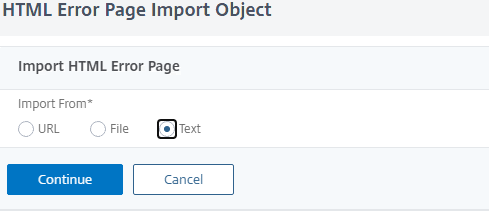
Click Continue
Enter basicerror_webgoat in the Name box.
Enter the following text in the File Contents box:
This request was blocked by the Citrix Web App Firewall.
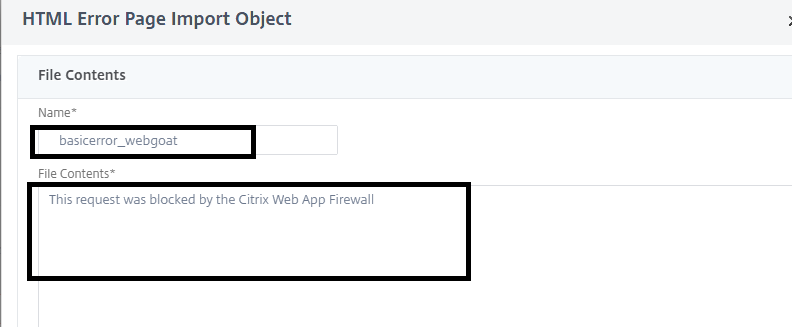
Click Done
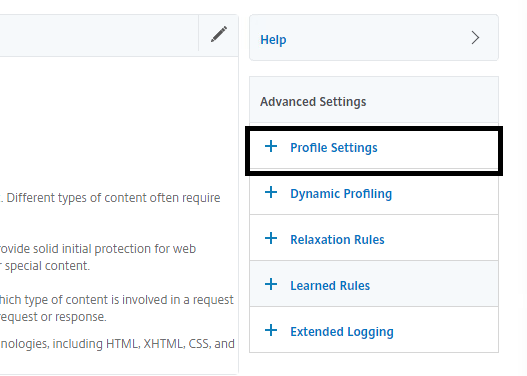
Step-3: Update the profile with initial profile settings
Select the profile appfw_prof_wegoat > click Edit. Click Profile Settings in the right side pane (under Advanced Settings)
Select HTML Error Object under HTML Error
Select basicerror_webgoat in the HTLM Error Object drop-down list.
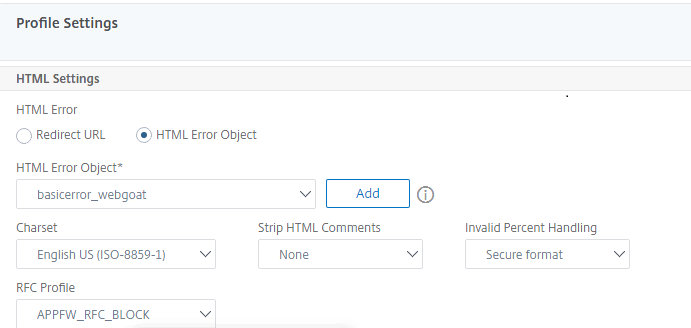
Click OK
Task-3: Create a Citrix Web App Firewall policy for webgoat
Browse to Security > Citrix Web App Firewall > Policies > Firewall > Click Add.
Enter appfw_pol_webgoat in the Name box.
Select appfw_prof_webgoat in the Profile drop-down list.
Enter True in the Expression box. (Default policy engine true value constant.)
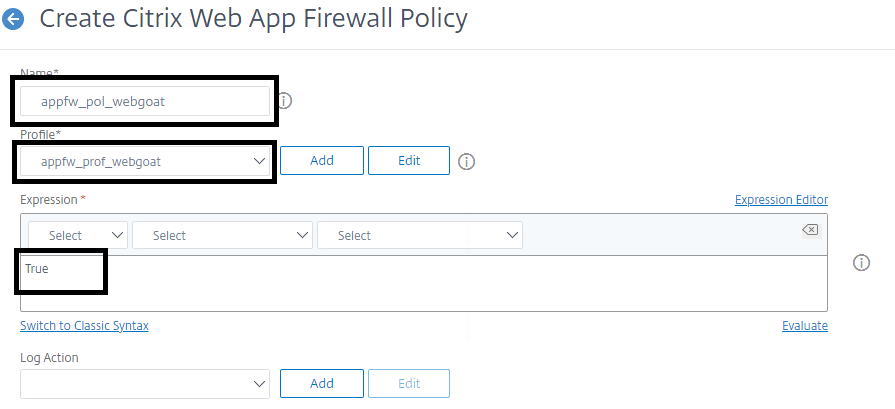
Click Create
Task-4: Bind the Citrix Web App Firewall policy with webgoat
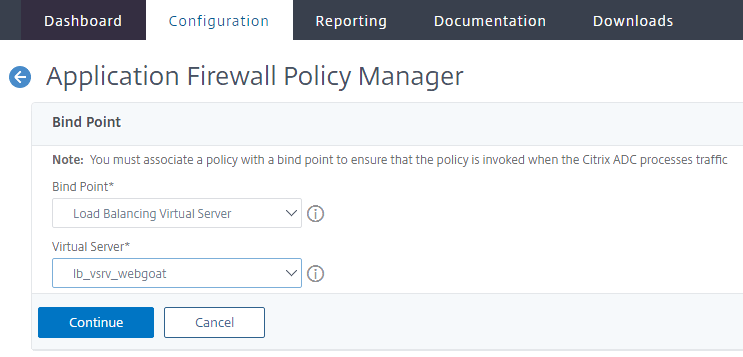
Select the bind point:
Click on Policy Manager in the rightmost pane > Select Load Balancing Virtual Server under Bind Point > Select lb_vsrv_webgoat under Virtual Server > Click Continue.
Click on Select Policy > Select appfw_pol_webgoat and click Select > Make sure that Priority is set to 100 > Click Bind
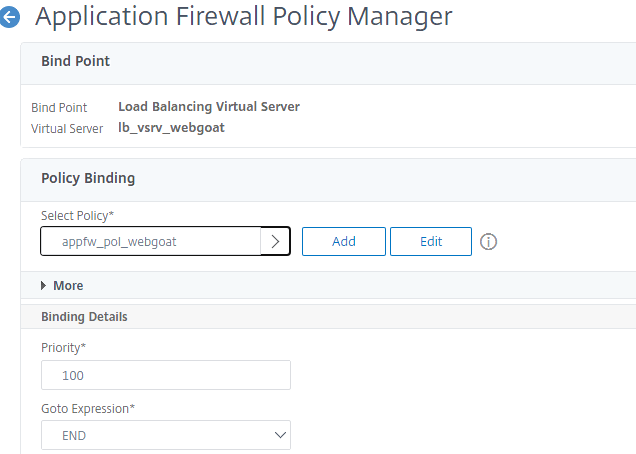
Click Done
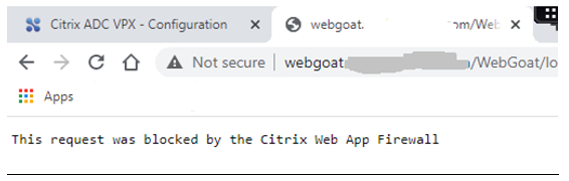
Task-5: Test the initial profile settings:
Browse http://webgoat.abc.com/
Note:-Make sure that the request is blocked by Citrix WAF
Browse to http://172.X.X.112/
Note:-Make sure that the request is also blocked by Citrix WAF
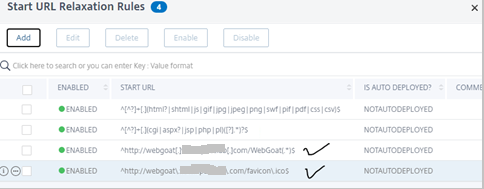
Task-6: Update the Start URLs in the WebGoat profile to allow access to content:
Step-1 Create Relaxation Rule
Browse to Security > Citrix Web App Firewall >Profiles.
•Select the appfw_prof_webgoat checkbox and click Edit.
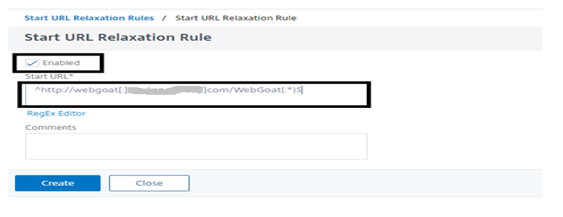
•Select the Start URL checkbox under Relaxation Rules and click Edit.
•Click Add.
•Enter the following regular expression in the Start URL box:
^http://webgoat[.]abc[.]com/WebGoat(.*)$
Note: This syntax written using regular Expression you can use this reference
https://en.wikipedia.org/wiki/Regular_expression
Click Create
Use same process to Create another rule for following syntax:
^http://webgoat\.abc\.com/favicon\.ico$
Step-2 Test the connection to WebGoat
Browse http://webgoat.abc.com/webgoat/login
Note:-Make sure that the request is allow by Citrix WAF

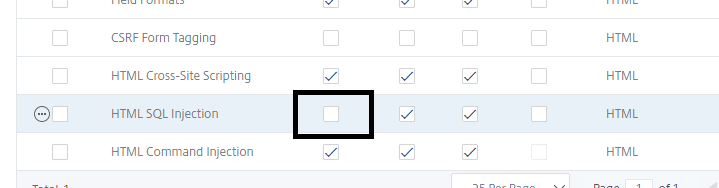
Task-7: SQL Injection Protection
Step-1 verify security check for HTML SQL injection
Go to webgoat profile and click on edit > select Security check and verify Block is uncheck in front of HTML SQL injection
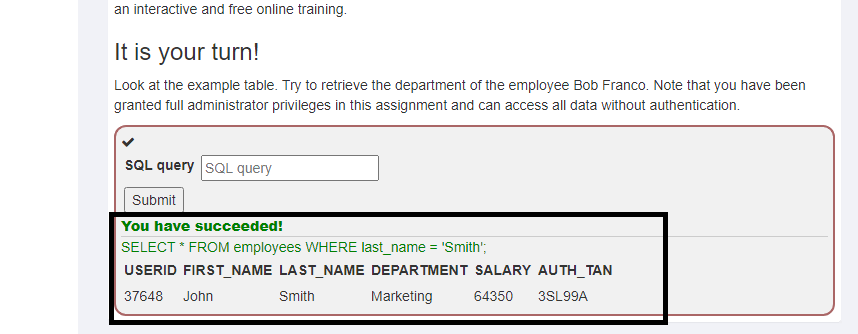
Step-2: SQL injection attack on webgoat.abc.com
Browse to http://webgoat.abc.com/WebGoat/login
Login with below credentials:
Username: username
Password: *****
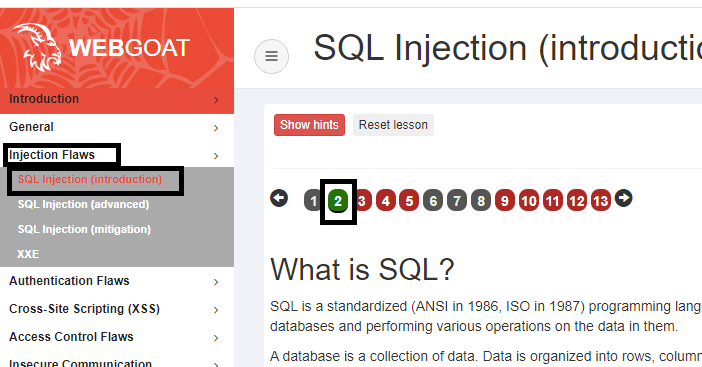
Access the SQL Injection lesson in WebGoat:
Browse to Injection Flaws > SQL Injection (Introduction) > page-2

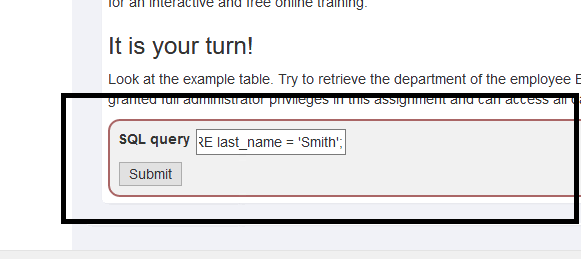
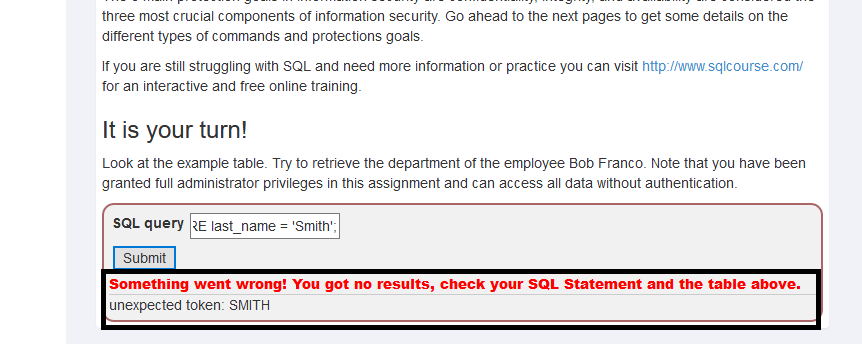
Enter the following string in the SQL query box:
SELECT * FROM employees WHERE last_name =’Smith’;
Click Submit
Verify response of webgoat: look in screenshot injection was perform successfully
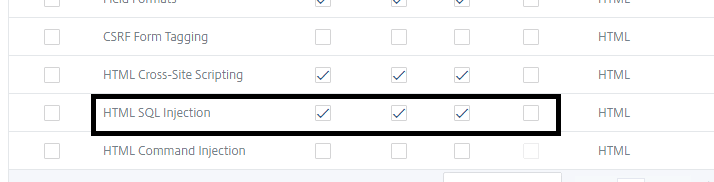
Step-3: Enable Block action for HTML SQL injection:
Go to webgoat profile and click on edit > select Security check and check Block action in front of HTML SQL injection
Step-4 verify SQL injection attack on webgoat.abc.com
Browse to http://webgoat.abc.com/WebGoat/login
Login with below credentials:
Username: username
Password: *****
Access the SQL Injection lesson in WebGoat:
Browse to Injection Flaws > SQL Injection (Introduction) > page-2
Enter the following string in the SQL query box:
SELECT * FROM employees WHERE last_name =’Smith’;
Click Submit
Verify response of webgoat: look in screenshot sql injection not working
Let’s look in Log file.
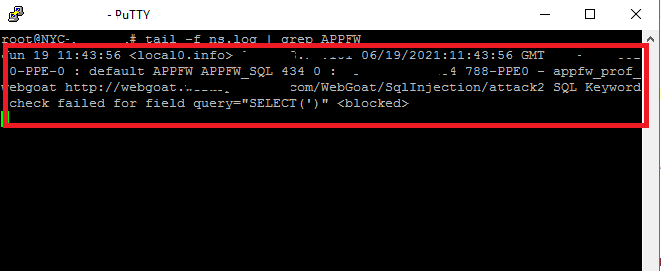
Attack was blocked by citrix web application firewall.
Step-5 Configure Transform Action
Transformation will allow the request but filter the dangerous syntax from request.
Update the WebGoat profile to transform SQL Injection:
Browse to Security > Citrix Web App Firewall > Profiles.
Select the appfw_prof_webgoat checkbox and click Edit.
Click Security Checks under Advanced Settings.
Update Security Check to transform instead of a block on the violation:
Select the HTML SQL Injection checkbox under Security Checks and click Action Settings.
Uncheck the Block checkbox.
Select the Transform SQL special characters checkbox.
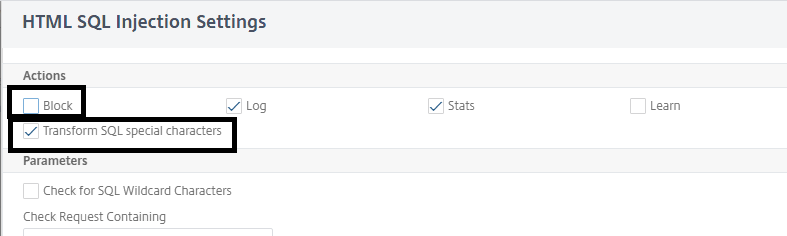
Click OK to apply changes
Let’s verify the changes:
Access the SQL Injection lesson in WebGoat:
Browse to Injection Flaws > SQL Injection (Introduction) > page-2

Enter the following string in the SQL query box:
SELECT * FROM employees WHERE last_name =’Smith’;
Click Submit
Verify response of webgoat: look in screenshot sql injection not working its giving request error.
Let’s look in log file.

Attack was filtered by Citrix WAF.
Task-8: Configure Signature Protections for WebGoat
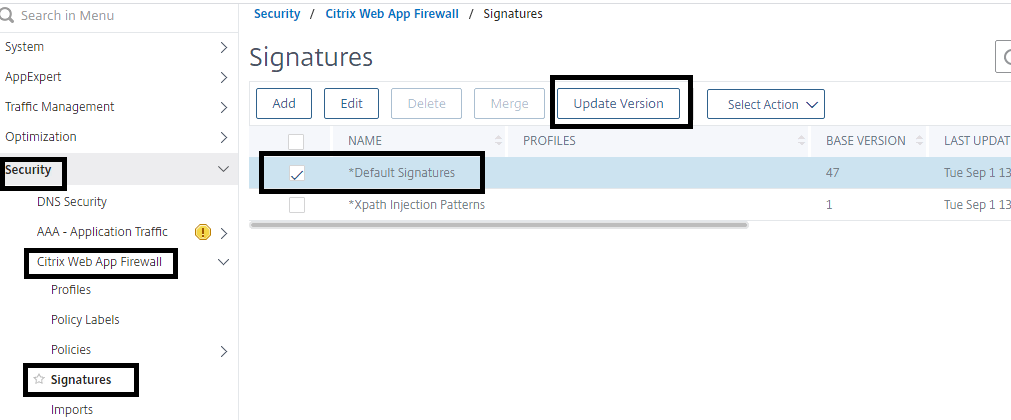
Step-1 Update Signature Version
Connect to the Citrix ADC Configuration Utility>Browse to Security > Citrix Web App Firewall > Signatures.
Select the *Default Signatures checkbox and then click Update Version
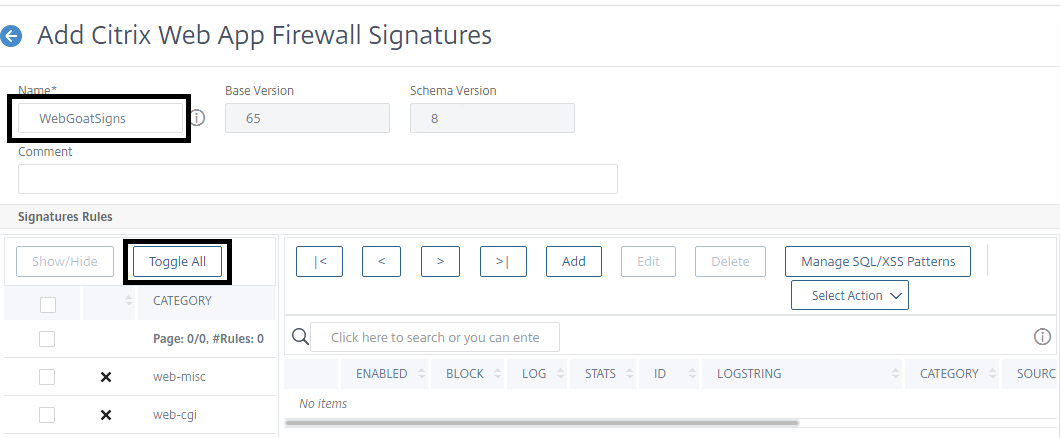
Step-2 Create a new custom signature based on the default signature
Select the *Default Signatures checkbox and click Add
Enter WebGoatSigns in the Name box. • Click Toggle All under Signature Rules to disable all the signatures to display
Step-3 Add Signature in webgoat Signature file
Enable the Shell Shock protection rules:
Select the web-shell-shock checkbox and click Show/Hide to display the rules in this category.
Verify the web-shell-shock rules are displayed
Click Select Action in the rightmost pane and click Enable all.
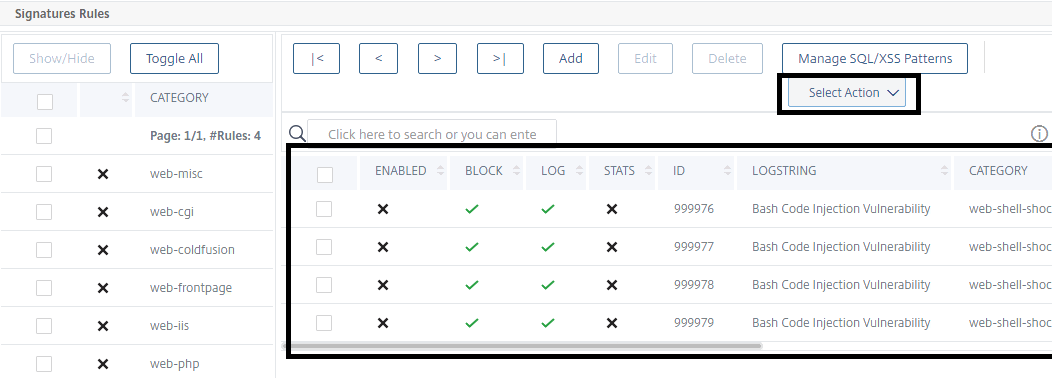
Click Yes to confirm
Select the web-shell-shock checkbox under Category in the left pane and click Show/Hide to clear display list
Enable an individual rule from the web-misc protection to protect passwd file:
Select web-misc under Category and click Show/Hide
Type LogString: passw in the Search pane
Select the rule: Rule ID: 1122: WEB-MIS/etc/passwd.
Click Select Action > click on Enable rules to enable the selected rule(s)only

Click OK to apply changes
Step-4 Add custom signature settings to the WebGoat profile
Browse to Security > Citrix Web App Firewall > Profiles.
Select the appfw_prof_webgoat checkbox and click Edit.
Click Profile Settings under Advanced Settings > Scroll down to the Common Settings section.
Select webgoatsigns under Bound Signatures
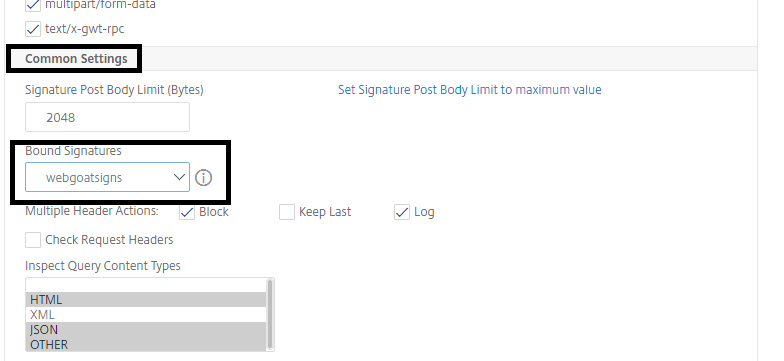
Click OK to apply changes to the Profile Settings.
Click Done
Step-5 Verify the Signature result
Login to http://Webgoat.abc.com/WebGoat/login
Browse to General > Http Basics > Page#2
Enter the following in the Enter your Name box:
() { :;}; echo vulnerable

Click Go
Note: Nothing was happened at web browser
Let’s Look in Logs file.

Attack was blocked by Citrix Web application firewall.


Exceptionally comprehensive and well-presented view and instructional on the power of the WAF module in CitrixADC in a hybrid security model!
Amazing writeup. This is not my specialty so the concepts are more advanced beyond my understanding. Hopefully for those in this field will benefit from this comprehensive deep dive.